Most people who ask about rooftop solar installation aren’t ready to sign a contract yet. They just want to know what actually happens — how many steps there are, how long it takes, and what might go wrong along the way. That’s a fair thing to want to know before you let someone put panels on your roof.
Here’s the honest version, step by step.
The Short Version First
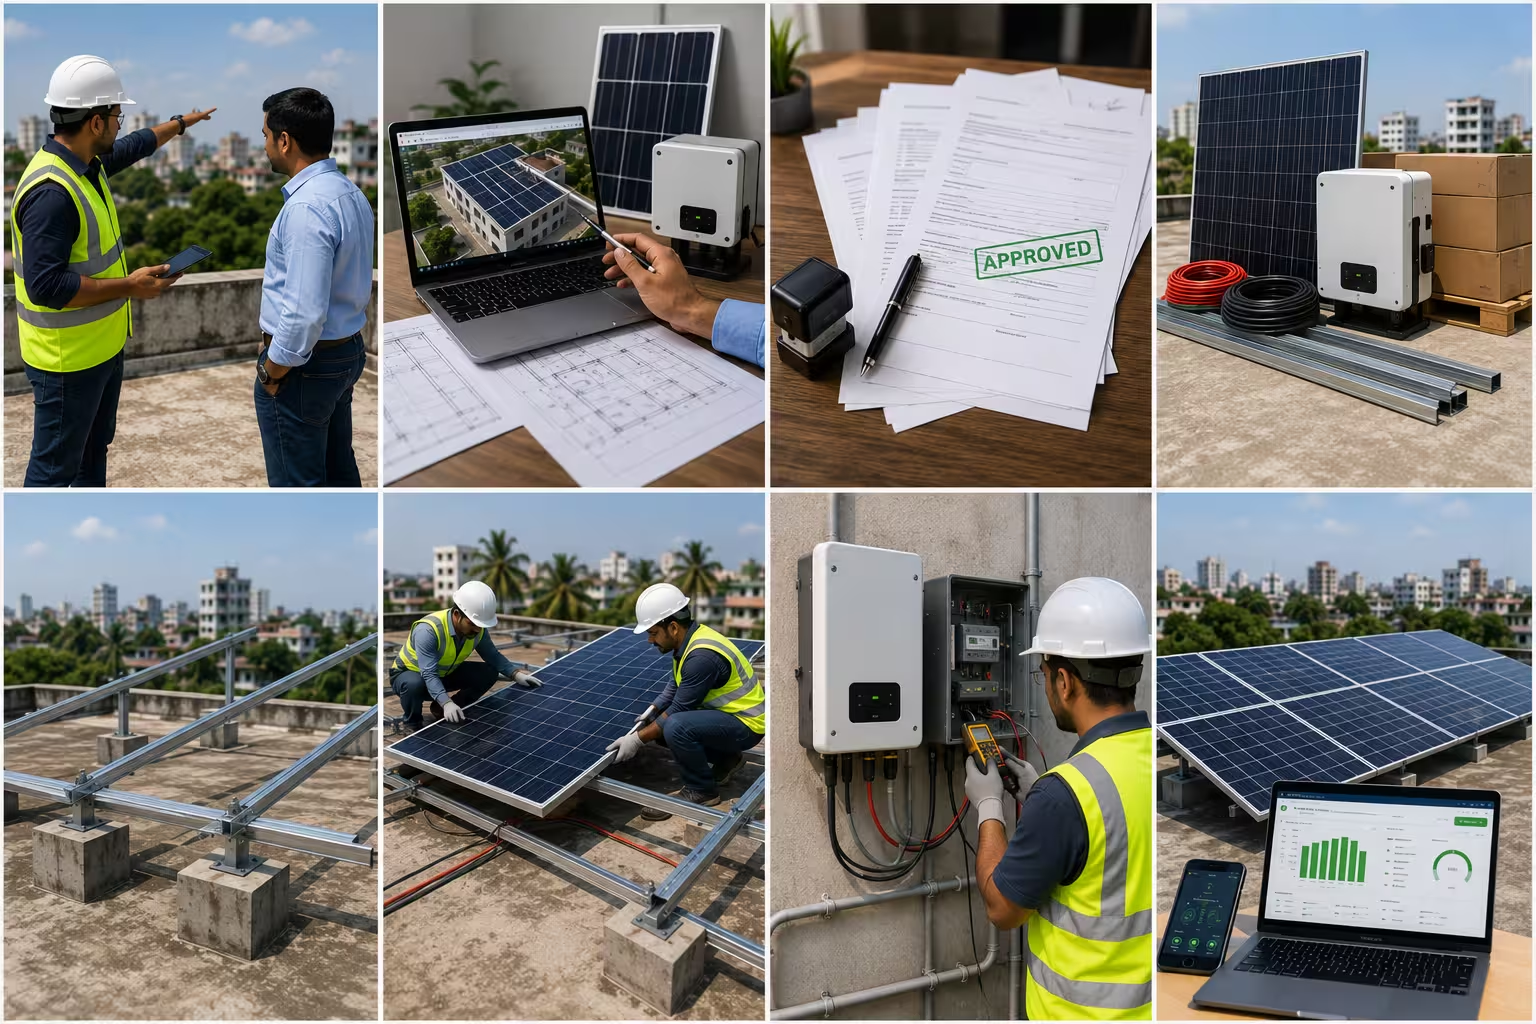
Rooftop solar installation generally follows eight stages: site survey, system design, approvals and net metering, equipment procurement, mounting, wiring, testing and commissioning, and finally activation. In practice, the technical work — mounting, wiring, testing — can be done in a few days for a typical home system. What actually determines your timeline is everything around it: how quickly your roof survey turns into a design, how long utility approval takes, and how fast the equipment arrives.
If someone quotes you “installation in one day,” they’re probably only talking about the physical mounting and wiring — not the weeks of approval and procurement that come before it.
Step 1: Site Survey and Roof Assessment
Before anyone talks panel count or price, a proper installer should physically inspect your roof. This isn’t a formality — it’s where most future problems get caught or missed.
The survey looks at:
- Structural condition — can the roof actually carry the added weight of panels and mounting hardware, or does it need reinforcement first?
- Orientation and tilt — which direction the roof faces and how steep it is affects how much sunlight the panels will actually capture.
- Shading — nearby buildings, water tanks, trees, or even your own rooftop water tank can cast shadows that cut into output for part of the day.
- Roof type and dimensions — an RCC flat rooftop, common across urban Bangladesh, is handled very differently from a tin-shed roof on a smaller factory or workshop. The dimensions also determine how many panels will actually fit.
If you live in an apartment building, this step has an extra layer most installation guides skip entirely: rooftop access usually isn’t yours alone to give. Getting sign-off from the building committee or other flat owners often needs to happen before or alongside the technical survey — and it’s worth starting that conversation early, because it can take longer than the survey itself.
For industrial buildings, the equivalent concern is structural load capacity across a much larger roof area, plus whether the factory’s electrical setup can handle a three-phase grid connection for a larger system.
Step 2: System Design
Once the survey is done, the installer designs a system sized to your actual situation — not a generic package. This is where decisions get made about:
- Panel type — monocrystalline panels are more efficient per square foot (useful where roof space is tight, like many urban homes), while polycrystalline panels are usually cheaper for the same footprint if space isn’t a constraint.
- Inverter type — a string inverter is simpler and cheaper, working well when your whole roof gets similar sunlight. Microinverters cost more but handle shading and multi-directional roofs better, since each panel operates independently.
- Battery storage (optional) — relevant if you want backup power during outages, not just bill savings. This turns a simple grid-tied system into a hybrid one, which changes both cost and design.
There’s no single “best” choice here — it depends on your roof, your budget, and whether outages matter to you as much as your monthly bill does. A company like Muspana handles this sizing and selection step directly, matching the design to your actual roof survey rather than a standard template.
For homes, sizing is usually based on your monthly electricity consumption and peak usage. For factories or commercial buildings, it’s based on operational load, and the numbers — and the stakes of getting them wrong — are considerably larger.
Step 3: Approvals and Net Metering
This is the step that varies most by country, and it’s also the one most likely to catch people off guard.
Net metering, in plain terms, is the arrangement that lets you send surplus solar power back into the grid and get credited for it — so on a sunny afternoon when you’re generating more than you’re using, that extra electricity isn’t wasted.
In Bangladesh, net metering approval goes through your local distribution utility — which one depends on your area (DESCO, DPDC, and others operate in different regions). Because the exact process, required documents, and current processing time can differ by utility and region, it’s worth confirming the specifics with your installer or the utility directly rather than assuming a fixed number of days. Anyone who promises you an exact universal timeline for this step is guessing.
What you can control is document readiness — incomplete paperwork is the single biggest cause of delay here, far more than the utility’s actual processing speed.
Step 4: Equipment Procurement
With approvals moving and a finalized design, the next step is ordering the actual hardware: panels, inverter, mounting structure, wiring, and batteries if included.
Worth knowing upfront: most solar equipment used in Bangladesh is imported, which means procurement timing can depend on shipping and customs clearance as much as on the supplier’s stock. This is one of the real practical differences from installation guides written for markets with strong domestic manufacturing — it’s not something to be alarmed about, just something to plan around when you’re setting expectations for your project timeline.
Proper sizing at this stage should be based on your actual consumption pattern, including your peak-usage months, not just an average taken across the year.
Step 5: Mounting and Panel Installation
This is the physical work most people picture when they think of “solar installation.”
The mounting structure goes up first — the type depends heavily on your roof. Ballasted or elevated mounts are common on flat RCC rooftops since they don’t require penetrating the roof surface. Tin-shed roofs, more typical for smaller industrial units, need different fixing hardware entirely.
Panels are then bolted onto the mounts at the correct tilt and orientation to catch the most sunlight through the day. Getting this step rushed or done cheaply is one of the more common sources of long-term problems — loose mounting shows up as reduced output or even panel damage years later, not immediately.
Step 6: Electrical Wiring and Connections
Panels are wired together — either in series or parallel, depending on the system design — and connected to the inverter using MC4 connectors, the industry-standard plug for solar wiring because of their weatherproofing and safety.
The inverter is where the real conversion happens: solar panels produce DC electricity, but your home or business runs on AC, so the inverter does that conversion before the power reaches your wiring. If the system includes battery storage, that’s wired in at this stage too.
Step 7: Testing and Commissioning
Before anything is switched on for daily use, the system gets tested — voltage, current, and overall performance are checked to confirm everything is working as designed, not just installed correctly on paper.
Many systems now include remote monitoring, which lets you (and often your installer) track energy generation and system health from a phone or dashboard. This matters more than it sounds — it’s usually how underperformance gets noticed early, rather than discovered months later on an electricity bill that didn’t drop as expected.
Step 8: Final Grid Connection and Activation
The last step is formal activation with your utility, which is what actually enables net metering credits to start counting toward your bill. Once this is confirmed, the system is fully live.
What Can Actually Delay the Process
A few things separate a smooth installation from a frustrating one:
- Roof condition — if your roof has leaks or structural weak spots, fix them before installation. Removing panels later to repair a roof underneath them is expensive and avoidable.
- Shading — even partial shading on part of the array can meaningfully reduce output; how much depends on panel layout, inverter type, and time of day, so it’s worth discussing specifically for your roof rather than relying on a generic percentage.
- Incomplete paperwork — the most common and most avoidable cause of approval delays.
- Monsoon timing — installation work involving roof access is safer and faster outside the heaviest monsoon months (roughly June to September), so scheduling around the season can save time overall.
Home vs. Industrial: What Actually Differs
| Home / Residential | Industrial / Commercial | |
| System sizing basis | Household consumption, peak usage months | Facility operational load |
| Roof type | Usually RCC flat rooftop | Often tin-shed or large flat industrial roofing |
| Approval complexity | Standard residential net metering | Often three-phase connection agreements, more documentation |
| Decision-maker | Homeowner or apartment committee | Facility manager, procurement team, or business owner |
| Primary concern | Monthly bill reduction, backup power | ROI, uptime, operational cost |
How to Tell If an Installer Is Doing This Properly
If you take one thing from this article for vetting purposes: a legitimate installer follows this sequence in order. Survey before design. Design before approval. Approval before installation. If someone offers to start mounting panels before your net metering application is even filed, or skips the structural roof assessment entirely, that’s worth questioning — not because it’s always a scam, but because skipping steps is how avoidable problems happen later.
Frequently Asked Questions
How long does the whole rooftop solar installation process take?
The physical mounting and wiring can often be completed within a few days for a typical home system. The full process — including survey, design, approvals, and equipment procurement — usually takes several weeks, largely depending on how quickly utility approval and equipment delivery go, both of which vary by region and supplier.
Do I need approval before installing solar panels?
Yes. Net metering approval from your local distribution utility is a required step, not optional paperwork — it’s what allows your system to be legally connected to the grid and credited for surplus energy.
Can apartment owners install rooftop solar?
Yes, but rooftop access in apartment buildings usually needs approval from the building committee or other flat owners first, since the roof isn’t typically owned by a single flat. It’s worth starting that conversation early in the process.
What happens if my roof isn’t strong enough for solar panels?
A proper site survey should catch this before installation begins. If reinforcement is needed, it’s far cheaper and easier to handle it before mounting than to remove an installed system later to fix structural issues underneath it.
What’s the difference between on-grid, off-grid, and hybrid solar systems?
An on-grid system stays connected to the utility grid and uses net metering to offset your bill, but doesn’t work during a grid outage unless paired with storage. An off-grid system runs independently with batteries and no utility connection. A hybrid system combines grid connection with battery storage, offsetting your bill while also providing backup power. For most homes and businesses starting out, on-grid or hybrid tends to be the more practical choice, since fully off-grid systems require significantly more battery capacity.