Most people who start looking into solar power get a quote, a glossy brochure, and not much else. Nobody explains what actually happens between signing the contract and flipping the switch on a working system. That gap is where a lot of anxiety lives — will they damage the roof, how long is this going to drag on, what am I supposed to be doing while all this happens?
Here’s the process laid out in order, with the parts that installers rarely explain clearly.
What Are the Steps in Solar Panel Installation?
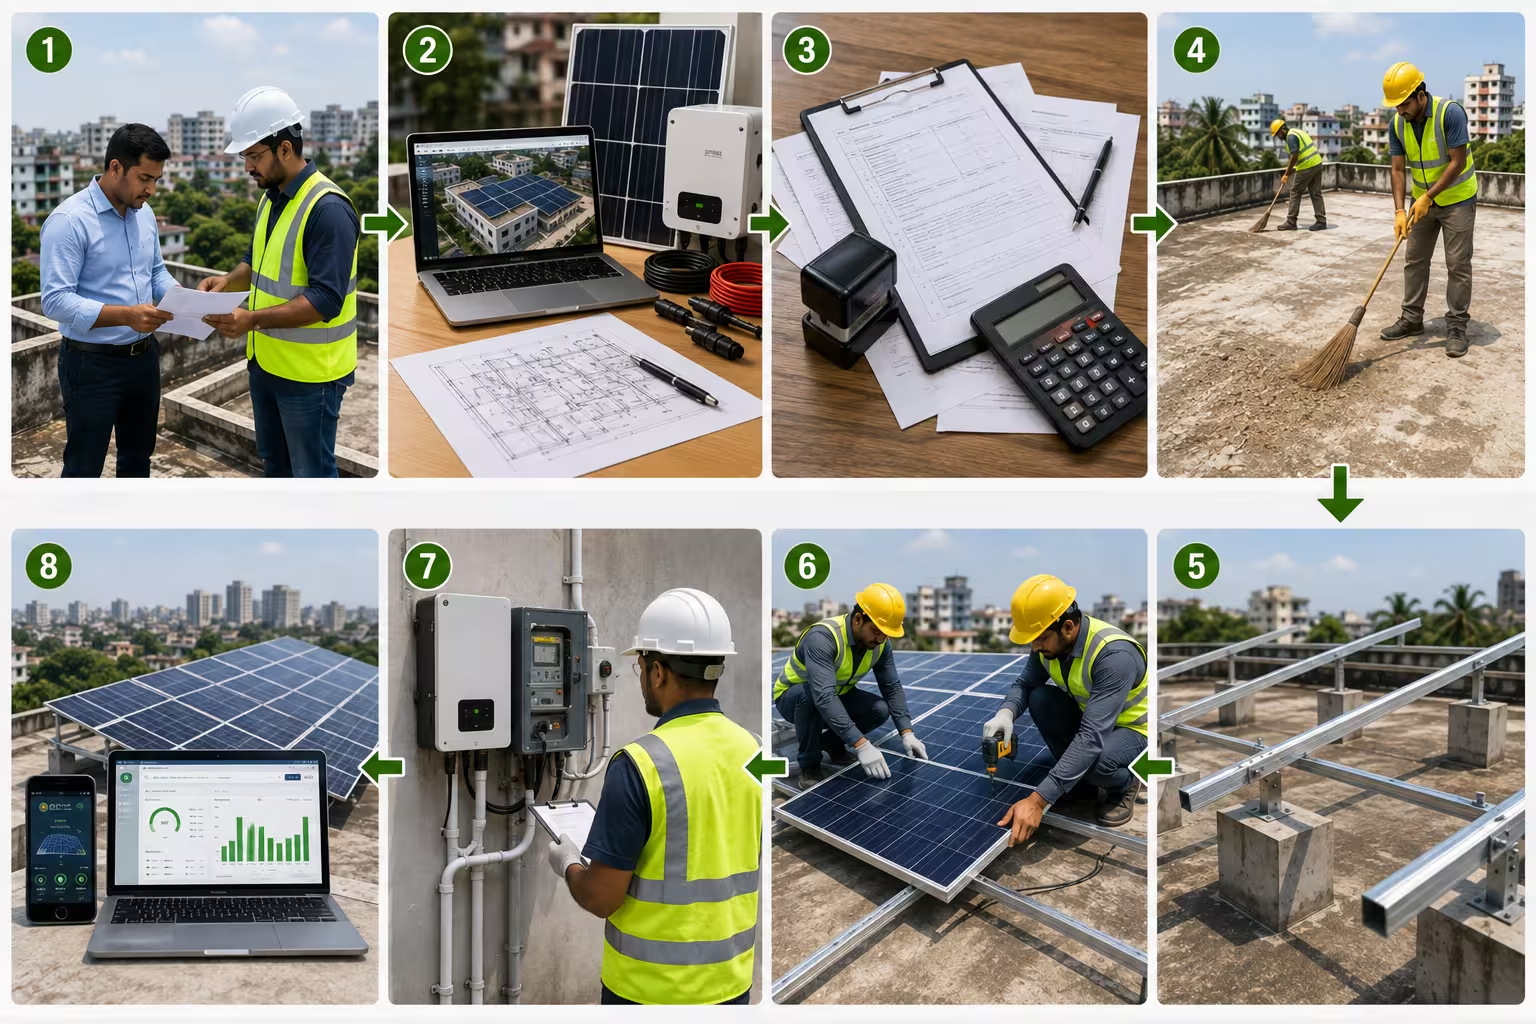
At a glance, a rooftop solar installation moves through eight stages:
- Energy assessment and site evaluation
- System design and equipment selection
- Cost planning, financing, and permits/utility approval
- Preparing the installation site
- Mounting structure installation
- Panel installation and electrical wiring
- Inspection and utility interconnection
- Activation and ongoing monitoring
Some of these steps are things you decide. Others are purely technical work your installer handles. Knowing which is which is most of what separates a smooth installation from a frustrating one.
Step 1: Energy Assessment and Site Evaluation
This starts with your electricity bills, not your roof. A good installer will ask for six to twelve months of bills to understand your actual consumption pattern — how many units you use monthly, when your usage peaks, and whether that peak lines up with daylight hours. This is what determines system size; skip it and you end up with a system that’s either oversized (wasted money) or undersized (you’re still buying grid power at peak rates).
Then comes the physical site visit. The installer checks roof orientation, available space, shading from neighbouring buildings or trees, and — this matters more in Bangladesh than in most installation guides written for other markets — the actual condition and type of the roof. A flat RCC rooftop in a Dhaka apartment building behaves very differently from a tin-shed roof on a house in a smaller town, and the assessment should reflect that, not just note “roof present.”
What you decide here: your budget ceiling and whether you’re building for full grid independence, partial offset, or backup during load-shedding.
Step 2: System Design and Equipment Selection
With your consumption data and site conditions in hand, the installer designs a system around your actual numbers — not a generic package. This covers:
- Panel type — monocrystalline (higher efficiency, higher cost) or polycrystalline (lower cost, slightly lower efficiency)
- Inverter type — string inverter for straightforward grid-tied setups, hybrid inverter if you want battery backup
- Batteries — only relevant for off-grid or hybrid systems; if load-shedding resilience matters to you, this is where that gets built in
- Mounting structure — determined by your roof type, covered in detail below
Direction and tilt matter here too. In the Northern Hemisphere, south-facing panels generally capture the most sunlight over a year, and tilt angles typically fall somewhere in the 15–36 degree range depending on latitude — Bangladesh’s relatively low latitude means the ideal tilt tends toward the lower end of that range, though the exact optimum depends on your specific location and whether you’re prioritising annual output or performance during a particular season.
A basic equipment checklist at this stage includes solar modules, an inverter and (if applicable) charge controller, mounting rails or ballasts, MC4 connectors, AC/DC wiring, earthing cables, and lightning/surge protection. If a quote you’re comparing skips any of these line items, ask why.
Step 3: Costs, Financing, and Permits
This is the step most guides gloss over, and it’s often the one that actually determines your timeline.
Cost planning: Solar system pricing in Bangladesh varies significantly by system size, panel brand, battery inclusion, and installer — there isn’t a single reliable market-wide figure to quote here, and any number presented as a fixed “solar costs X taka” claim should be treated as an estimate, not a fact. Ask installers for an itemised quote (panels, inverter, mounting, wiring, labour, permits) rather than a single lump sum — it’s the only way to compare quotes meaningfully.
Permits and utility approval: This is the part that catches people off guard. If you’re connecting to the grid, you typically need approval from your local electricity distribution utility (DESCO, or your regional PDB/utility depending on where you are) as well as a net metering interconnection agreement if you want to export surplus power back to the grid. Bangladesh has an active net metering framework, but the specific application process, capacity limits, and approval timeline depend on your utility and location — this is worth confirming directly with your local provider rather than assuming a fixed timeframe, since it’s genuinely variable and can be one of the slower parts of the whole process.
This is also typically where a company like Muspana earns its keep for a lot of customers — not the panels themselves, but managing the paperwork and utility coordination that most homeowners have never dealt with before.
Step 4: Preparing the Installation Site
Before anything gets mounted, the site needs to be ready. That means clearing overhanging branches or debris, and — critically — checking whether the roof structure itself can handle the additional load and decades of exposure to weather and mounting hardware. If your roof is older or shows signs of wear, re-roofing before installation is genuinely worth considering; it’s far cheaper to do it now than to remove and reinstall panels later.
| Roof Type | Common Mounting Approach |
| Flat RCC rooftop | Ballast-mounted or tilted frame systems, weighted rather than penetrating the roof |
| Sloped tin-shed/CI sheet roof | Rail-based mounting anchored directly to the roof structure |
| Sloped tile/asphalt roof | Railed mounting system with flashing to prevent leaks |
Step 5: Mounting Structure Installation
The mounting structure is the physical foundation everything else attaches to, so it has to be right the first time. Installers set the tilt angle, secure rails or supports with flashings, screws, and sealant to prevent water ingress, and make sure the whole structure can handle wind loads — a genuinely important consideration during Bangladesh’s monsoon and cyclone season, more so than in most markets these installation guides are originally written for.
Get this step wrong and every problem downstream (leaks, panel instability, structural stress) traces back to it.
Step 6: Panel Installation and Electrical Wiring
Panels get bolted onto the completed mounting structure, aligned and secured at multiple points, with enough spacing between them for airflow and future maintenance access. Then comes the wiring: panels get connected via MC4 connectors in series or parallel depending on the system’s voltage requirements, followed by the inverter, charge controller (if using batteries), and proper earthing.
Correct wire sizing isn’t a minor detail — undersized wiring causes overheating and energy loss. This is one of the steps that genuinely should not be DIY’d; it requires understanding of electrical codes and load calculations that go beyond general handiness.
Step 7: Inspection and Utility Interconnection
Once physical installation is complete, the system needs to pass inspection against local building and electrical codes before it goes live. For grid-tied systems, the utility company typically also inspects the interconnection point before allowing the system to export power back to the grid. This inspection stage is another place where timelines can vary by location and utility workload — worth building some buffer into your expectations rather than assuming next-day approval.
Step 8: Activation and Ongoing Monitoring
Once approved, the system gets switched on and monitoring tools are set up to track daily production. This isn’t a “set and forget” moment. In Bangladesh’s climate, dust accumulation on panels is a real and recurring factor — panels in dustier areas or during dry seasons benefit from periodic cleaning, since accumulated dust measurably reduces output. Beyond cleaning, routine maintenance is mostly about checking connections and watching your monitoring data for unexpected drops in production, which can flag anything from a loose connector to a failing panel.
How Long Does Solar Installation Take?
As a general estimate, the physical installation itself — mounting through wiring — often takes a few days for a typical residential system. The real variable is everything around it: the design and quotation phase, financing decisions, and especially permit and utility interconnection approval, which can extend the overall timeline well beyond the installation days themselves. Treat any specific “installed in X days” claim from an installer as their estimate for their process, not a market-wide guarantee.
Home vs. Industrial Installations: What Changes
For a factory or commercial facility, the fundamentals above still apply, but a few things shift:
- Structural assessment becomes more rigorous — industrial roofs need proper load calculations, not a visual check
- System design scales up — larger arrays, often three-phase inverters, and more complex string configurations
- Permitting and procurement involve more parties — facility managers are often coordinating with utility companies, structural engineers, and sometimes multiple contractors simultaneously
- The priority shifts from savings to uptime and ROI — a factory in Gazipur or Narayanganj evaluating solar is usually thinking in terms of payback period and operational continuity, not monthly bill reduction
Common Questions to Ask a Prospective Installer
Rather than a generic conclusion, here’s what actually helps before you sign anything: ask for an itemised quote (not a lump sum), ask who handles the net metering application and how long they expect it to take, ask what happens if the roof assessment turns up structural issues, and ask what the maintenance plan looks like after installation — not just during it. An installer who answers these clearly and specifically is usually the one worth trusting.
FAQs
Do I need a permit to install solar panels in Bangladesh?
If you’re connecting to the grid, yes — you’ll typically need approval from your local electricity distribution utility, and a net metering agreement if you plan to export surplus power back to the grid. Requirements and timelines vary by utility and location, so it’s worth confirming directly with your provider early in the process.
How long does the whole solar installation process take?
The physical mounting-to-wiring work often takes just a few days for a typical home system. The bigger variable is design, financing, and permit/utility approval, which can extend the total timeline well beyond the installation days themselves — treat any fixed timeline claim as an estimate specific to that installer.
Can I install solar panels myself?
Some prep work (clearing the site, for example) is DIY-friendly, but mounting structure installation and especially electrical wiring involve safety and code requirements that are best left to a licensed installer. Getting the wiring wrong risks overheating, energy loss, or worse.
What roof types work for solar installation?
Both flat RCC rooftops and sloped tin-shed or tile roofs can support solar — the mounting approach just differs. Flat roofs typically use ballast or weighted frame systems, while sloped roofs use rail-based mounting anchored to the structure.
Is off-grid or hybrid solar worth it given load-shedding?
It depends on how much backup power matters to you and your budget — hybrid and off-grid systems add battery cost but provide power during outages, while a standard grid-tied system is cheaper but offers no backup when the grid goes down. It’s a genuine trade-off rather than a universally “better” option.
How often do solar panels need cleaning in Bangladesh?
Dust accumulation is a real factor that reduces output, especially during drier months. There’s no single fixed schedule that fits every location — a periodic check of your monitoring data for unexpected production drops is often the best signal that a cleaning is due.