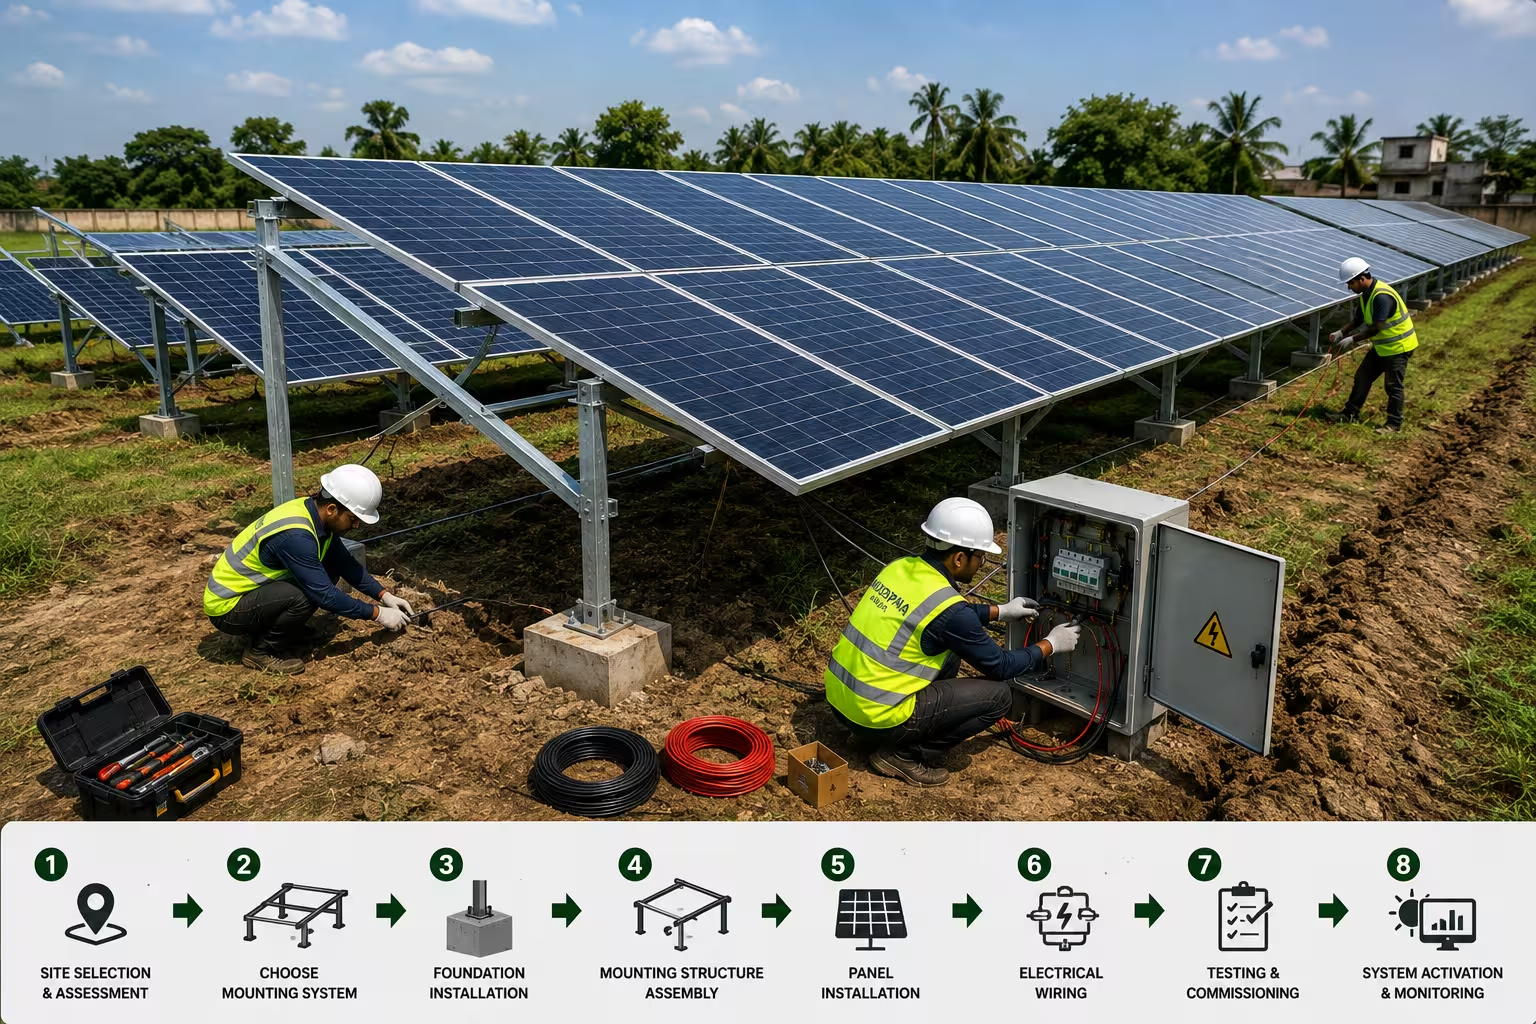
If you’ve got open land instead of a good roof, ground-mounted solar isn’t a workaround — it’s often the better system. No shading from a neighbouring building, no worrying about roof age or load capacity, and a lot more flexibility in how the array is angled toward the sun. But it’s also a different installation altogether from rooftop solar, with its own foundation work, its own soil questions, and its own set of things that go wrong if they’re rushed.
This is what the process actually looks like, step by step, and where Bangladesh’s soil, climate, and land economics change the picture from what you’ll read in a generic Western installation guide.
What Makes Ground-Mounted Solar Different From Rooftop
A ground-mount system holds panels on a freestanding frame anchored directly into the earth, instead of a roof structure. That means the installation starts with civil work — foundations, posts, sometimes concrete — before a single panel goes up. Rooftop solar skips that step entirely because the building already does the structural job.
The trade-off is straightforward. Ground-mount usually costs more upfront because of the site prep and foundation work, and it needs land you’re not using for something else. In exchange, you get better airflow around the panels (which helps performance in hot weather), easier access for cleaning and maintenance, and no constraints from roof orientation or shading. For a household or factory where the roof genuinely isn’t usable — too small, too shaded, structurally weak, or already occupied by water tanks and antennas — ground-mount is usually worth the extra site work. [Internal link: rooftop vs ground-mounted solar comparison]
Step 1: Site Selection and Assessment
Everything starts with picking the right patch of land, and this is where a lot of installations quietly go wrong before they’ve even begun.
You want a spot that gets direct sun for most of the day, with nothing — trees, a neighbour’s wall, a water tank — casting a shadow across it during peak hours. Even partial shading on part of an array can drag down output for the whole string, not just the shaded panel.
Beyond sunlight, look at the ground itself:
- Soil type. Sandy soil drains well but may need deeper anchoring. Clay-heavy soil, which is common across much of Bangladesh’s delta and low-lying regions, holds water and shifts more with moisture changes — this affects what kind of foundation will actually hold.
- Drainage and elevation. Land that pools water after rain is a real risk here, not a minor footnote. Bangladesh’s monsoon season puts far more stress on ground-mount foundations than the drier climates a lot of installation guides are written for. A site that looks fine in January can flood in July.
- Ground slope. A gentle, even slope is fine and can even help drainage. Uneven or steep ground adds cost and complexity to the racking.
A proper site survey checks all of this before any foundation work is planned — sunlight path, soil condition, drainage, and access for equipment and later maintenance. [Internal link: solar site survey checklist]
Step 2: Choosing a Mounting System
Once the site is confirmed, the next decision is what kind of frame will actually hold the panels. There are three common types, and the right one depends on budget, land use, and how much you want to actively manage the system.
| Mount Type | How It Works | Best For | Trade-offs |
| Fixed mount | Set at one tilt angle, doesn’t move | Most home and factory installations where simplicity and lower cost matter | Can’t adjust for seasonal sun angle changes; slightly lower year-round output than an optimised adjustable system |
| Adjustable mount | Tilt can be manually changed a few times a year | Sites where squeezing out extra seasonal output matters enough to justify the effort | Higher install cost, more moving parts, needs someone to actually do the adjusting |
| Pole mount | Panels sit on one or two poles, sometimes able to rotate | Smaller systems, off-grid setups, or sites where you want the land underneath still usable (grazing, storage, informal cropping) | Higher cost per panel for smaller arrays; less common for large-scale commercial systems |
For most home installations in Bangladesh, a fixed mount at a well-chosen angle covers the practical need without adding ongoing maintenance work. Pole mounts are worth a look specifically where the land underneath has some other use — this matters more here than in a lot of source material written for large open Western properties, since usable land in Bangladesh is rarely land you want sitting idle. [Internal link: mounting structure selection]
Step 3: Foundation and Structural Setup
This is the part that decides whether the system is still standing straight in five years, and it’s also where local soil conditions matter the most.
Foundations are typically either concrete footings or driven posts, depending on soil bearing capacity and how tall or heavy the racking is. Excavation depth commonly falls somewhere in the range of half a metre to a full metre, but that’s a general planning range, not a fixed number — the actual depth depends on soil type, expected wind load, and the specific mount design an engineer or installer signs off on for your site. Don’t treat any single depth figure as universal; a soft, waterlogged plot needs deeper or reinforced footing than firm, well-drained ground does.
Once the foundation is set, the racking frame goes up according to the manufacturer’s specifications — level, square, and securely bolted or anchored. For larger commercial or industrial arrays, this step follows formal engineering tolerances rather than general guidance, since structural failure on a large array is a genuine safety issue, not just a performance one.
Step 4: Panel Installation and Electrical Connections
With the frame in place, panels are mounted at the planned tilt and orientation, then wired into an inverter that converts the DC power the panels produce into the AC power your home or facility actually uses. Off-grid systems add batteries at this stage for storage.
A few things matter more than they might seem:
- Wiring and conduit need to be rated and installed correctly to avoid electrical faults down the line — this isn’t a place to cut corners.
- Grounding and earthing protect the system (and the people near it) from electrical faults, and matter even more in a country with frequent thunderstorms and lightning activity during monsoon season.
- Torque specifications on mounting bolts and electrical connections should be followed as specified, not tightened “until it feels right” — under- or over-torquing both cause problems over time.
This is also the stage where the difference between a home installation and a factory installation becomes obvious. A household system connects to existing home wiring with relatively modest load requirements. An industrial system has to integrate with a facility’s existing electrical infrastructure, often at higher capacity, and usually needs sign-off from an engineer familiar with the site’s full load profile — not just the solar array. [Internal link: solar wiring practices, solar earthing, solar lightning protection]
Step 5: Maintenance and Ongoing Optimisation
Ground-mounted systems are genuinely easier to maintain than rooftop ones — you’re not climbing onto a roof to clean a panel — but they’re not maintenance-free.
Dust and soiling build up faster on ground-mount systems near unpaved roads or construction, which is common in a lot of Bangladesh’s peri-urban and rural areas, so panels need more frequent visual checks and cleaning than a similar rooftop system might in a cleaner environment. If you went with an adjustable mount, this is also when you’d re-tilt seasonally to keep output closer to optimal — though realistically, most home owners settle on a fixed compromise angle rather than adjusting a few times a year.
One thing that’s easy to overlook until it’s a problem: an unattended, ground-level array in a rural or semi-rural setting carries real theft and vandalism exposure. A basic perimeter fence and reasonable visibility from the house or a caretaker’s line of sight go a long way, and it’s worth planning for at the same stage as everything else — not as an afterthought once the system is already installed. [Internal link: solar operation & maintenance, solar panel cleaning, solar soiling loss]
Step 6: Regulatory, Safety, and Permitting Checks
Before any ground gets broken, it’s worth confirming what your local electricity distribution utility requires for grid connection and, if relevant, net metering. Requirements and processes can vary and do get updated, so this is one area where you should check directly with your local utility rather than relying on a general article — that includes this one — for exact rules, fees, or timelines. [Internal link: solar permits, net metering application, discom approval solar]
Basic safety practice applies regardless of system size: proper PPE during construction, careful handling during electrical work, and a final quality check before the system goes live. For anything beyond a small home system, involving a licensed electrician or structural engineer isn’t optional caution — it’s how you avoid a foundation or wiring mistake that’s expensive, or dangerous, to fix later. [Internal link: solar installation safety, solar quality checks]
Home vs Industrial: What Actually Changes
The core process — site selection, foundation, mounting, wiring, maintenance — is the same whether you’re a homeowner or a factory. What changes is scale and stakes.
- Structural tolerance: A home array’s racking has more margin for error than an industrial array carrying a much larger, heavier panel load across a wider footprint. Commercial installations lean much more heavily on formal engineering sign-off.
- Electrical integration: Home systems tie into existing household wiring. Industrial systems have to work with a facility’s broader load and often involve procurement and contractor coordination that a household install simply doesn’t need.
- Land-use economics: For a homeowner, the land question is usually “is this space doing anything else useful right now.” For a factory, it’s often a harder calculation involving expansion plans, yard usage, and whether that land has more value used another way.
- Decision-makers: A home installation is usually one person’s call. An industrial one typically involves facility managers, procurement, and sometimes external engineering review before work starts.
If you’re evaluating this for a factory or commercial property, it’s worth reading through what changes specifically for industrial-scale solar before comparing quotes. [Internal link: solar for industries, solar for commercial buildings]
Where Muspana Fits Into This
Site assessment is genuinely one of the harder parts of this process to get right on your own — reading soil conditions, judging shading across the full day, and matching a mount type to the actual land you have takes some experience to do well. This is one area where Muspana can help before you commit to a layout or a foundation plan, rather than after something’s already been dug and poured.
The same goes for mount selection. Fixed, adjustable, and pole mounts each make sense in different situations, and getting that choice wrong is expensive to undo once the racking is anchored — Muspana can help match the mount type to your site, budget, and how you actually plan to use the land.
FAQs
How deep should a ground-mounted solar foundation be?
It typically falls somewhere between half a metre and a full metre, but the right depth depends on your soil type, the mount design, and expected wind load. Treat any specific number as a starting estimate, and confirm the actual depth with whoever is doing your site’s engineering assessment.
Is ground-mounted solar better than rooftop solar?
It depends on what you’re working with. If your roof is small, shaded, or structurally unsuitable, ground-mount is usually the better option despite higher upfront site costs. If your roof gets good sun and you’d rather not use land for the system, rooftop is often the simpler and cheaper route.
What’s the best tilt angle for ground-mounted solar panels in Bangladesh?
Bangladesh’s latitude is lower than the U.S. and European ranges most installation guides are written around, so a directly copied tilt figure won’t be accurate. The right angle depends on your specific location and system goals — treat any general figure as an estimate and get it confirmed against your exact site.
Do I need a permit to install ground-mounted solar panels in Bangladesh?
Requirements vary and can change, particularly around grid connection and net metering. Check directly with your local electricity distribution utility before starting installation rather than relying on a general figure from any article, including this one.
Can I install ground-mounted solar on clay or waterlogged soil?
Yes, but it changes your foundation approach. Clay-heavy or seasonally waterlogged soil, common across much of Bangladesh, usually needs deeper or reinforced footing and closer attention to drainage than firmer, well-drained ground would.
How much land do I need for a ground-mounted solar system?
It depends entirely on system size and mount type — there’s no single figure that applies to every household or facility. A proper site assessment, factoring in your energy needs and available space, is the only reliable way to answer this for your situation.
Who should install a ground-mounted solar system — can I do it myself?
Basic site clearing is reasonable DIY work, but foundation engineering and electrical connections are not areas to handle without qualified help. For anything beyond a very small system, a licensed electrician and, ideally, a structural assessment are worth the cost to avoid an expensive or unsafe mistake later.